


Testing the voltage of a power supply with multimeter
Testing the voltage of a power supply with multimeter
| Testing a power supply involves verifying that the output voltage and current are within the specified range and the power is functioning properly. By following these steps, you can test a power to ensure that it is functioning properly and within the specified voltate range. | |
| Testing equipment - | (1) a multi meter which is a device used to measure voltage, current, and resistance (2) a load resistor such as a resistor of the appropriate value or a 12V car light bulb |
| Disconnect the power supply from the device - | ensure there is no load connected to the power supply during testing |
| Set up the load resistor - | connect it to the output terminals of the power supply. The resistor should be rated for the voltage and current that the power supply can output. |
| Turn on the power supply - | plug your power supply into an AC outlet |
| Measure the output voltage - | (1) turn on the multimeter and switch the dial to the DC voltage position (2) connect the red (positive) probe to the output terminals of the power supply (Figure 1) (3) take the black (negative) probe and carefully touch it against the barrel of the plug without touching the tip or red probe, otherwise it will cause a short circuit 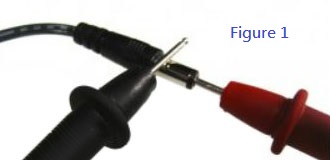 |
| Verify - | verify the voltage reading on your multimeter. If the output voltage is too low or too high from label rating, the power supply may be faulty. |